Introduction to AWS: EC2, S3, and Lambda
Welcome to your first hands-on experience with Amazon Web Services (AWS)! We’ve been running applications locally or in Docker containers on your laptop, you might be wondering: how do I actually deploy this to the cloud so the rest of the world can access it? We’ll be doing a simple “Hello, World” style exercise for AWS.
AWS is the dominant cloud provider, used by companies from startups to enterprises. Understanding how to provision cloud infrastructure is essential for modern DevOps work. While tools like Terraform (which we’ll explore soon) can automate infrastructure provisioning, you first need to understand what you’re automating.
In this lab, we’ll start with the fundamentals: creating a virtual server (EC2 instance), exposing it to the internet, and deploying a simple web application. By the end, you’ll have a publicly accessible web service running in the cloud and understand the basic building blocks of AWS infrastructure.
Prerequisites
Fisrt, you’ll need to install the AWS CLI v2. This is the canonical way to interact with AWS from your terminal, and we’ll need it setup in the future for Terraform. Follow the instructions on the AWS documentation for your respective system. Once you have it installed, you can run:
aws --version
You should see output like aws-cli/2.x.x Python/3.x.x...
AWS CLI Configuration
Before we can use AWS, we need to configure the CLI with your credentials. Each of you have been assigned an IAM (Identity and Access Management) user in our shared AWS account. You should have received an email with your login information. Log into the AWS console for our account at https://upenn-cis1912-fa25.signin.aws.amazon.com/console. Click your account name at the top right, and select “Security Credentials” from the dropdown. Scroll down until you see “Access keys” and click “Create access key”. Select “Command Line Interface (CLI)” as the use case, accept the confirmation, and create your access key. You should see an “Access key” and a “Secret access key”. DO NOT NAVIGATE AWAY FROM THIS PAGE, your credentials will only be viewable once.
Now, in your terminal, let’s configure the CLI:
aws configure
You’ll be prompted for four values:
AWS Access Key ID [None]: <paste your access key ID>
AWS Secret Access Key [None]: <paste your secret access key>
Default region name [None]: us-east-1
Default output format [None]: json
This creates two files in ~/.aws/:
~/.aws/credentials- Stores your access keys~/.aws/config- Stores configuration like default region
Security Note: Never commit these files to git or share your secret access key. If you accidentally expose it, notify your instructor immediately so we can revoke and regenerate your credentials.
Let’s verify the configuration works:
aws sts get-caller-identity
You should see output like:
{
    "UserId": "AIDAXXXXXXXXXXXXXXXXX",
    "Account": "123456789012",
    "Arn": "arn:aws:iam::123456789012:user/<email>"
}
If this works, you’re all set! The AWS CLI is now configured to authenticate as your IAM user.
Understanding AWS EC2
Before we start clicking buttons or running commands, let’s understand what we’re building on top of.
EC2 (Elastic Compute Cloud) is AWS’s virtual server service. When you launch an EC2 instance, you’re getting a virtual machine running in one of Amazon’s data centers. You can SSH into it, install software, run services - it’s just like any regular Linux machine, except you can spin it up or down in minutes and pay only for what you use.
Key concepts for EC2:
- Instance Type: Defines the hardware (CPU, memory, network). We’ll use
t2.microwhich is small and free-tier eligible. - AMI (Amazon Machine Image): The operating system template. We’ll use Amazon Linux 2023, a Debian-based distribution optimized for AWS.
- Security Group: A firewall that controls inbound and outbound traffic to your instance. We’ll need to allow HTTP (port 80) and SSH (port 22).
- Key Pair: SSH keys for secure access. AWS stores the public key, you download the private key.
- Public IP: Makes your instance accessible from the public internet. Without this, it’s only accessible within AWS’s network.
We will need to do the following:
- Create a key pair (SSH access)
- Create a security group (firewall rules)
- Launch an EC2 instance with those settings
- Connect via SSH and deploy your application
- Access it via the public IP
Before proceeding, make sure your AWS region selected in the console is us-east-1, you can change this in the dropdown on the top right.
Launching an EC2 Instance
We’ll be using the console to launch our EC2 instance. Select EC2 from the search bar on the top left, then click “Launch Instance”. Thankfully, the AWS console lets us create almost everything we need right within this page (particularly the security group and key pair). Name your instance whatever you’d like and select “Amazon Linux” as the application image (this should be selected by default). Next, under instance type, ensure that “t2.micro” is selected.
Creating a key pair
Under “Key pair (login)”, select “Create key pair”. Name this something like ssh_access and create it (the type of key pair doesn’t really matter). This will download a file ssh_access.pem onto your computer, we’ll need this later.
Creating a security group
Under “Firewall (security groups)” in “Network settings”, make sure you’ve selected to create a new security group. Select both “Allow SSH traffic from” and “Allow HTTP traffic from the internet”, and make sure to allow SSH traffic from 0.0.0.0/0 (anywhere).
Launching the instance
Now we’re ready to launch our instance. Your configuration should look something like the screenshot below:
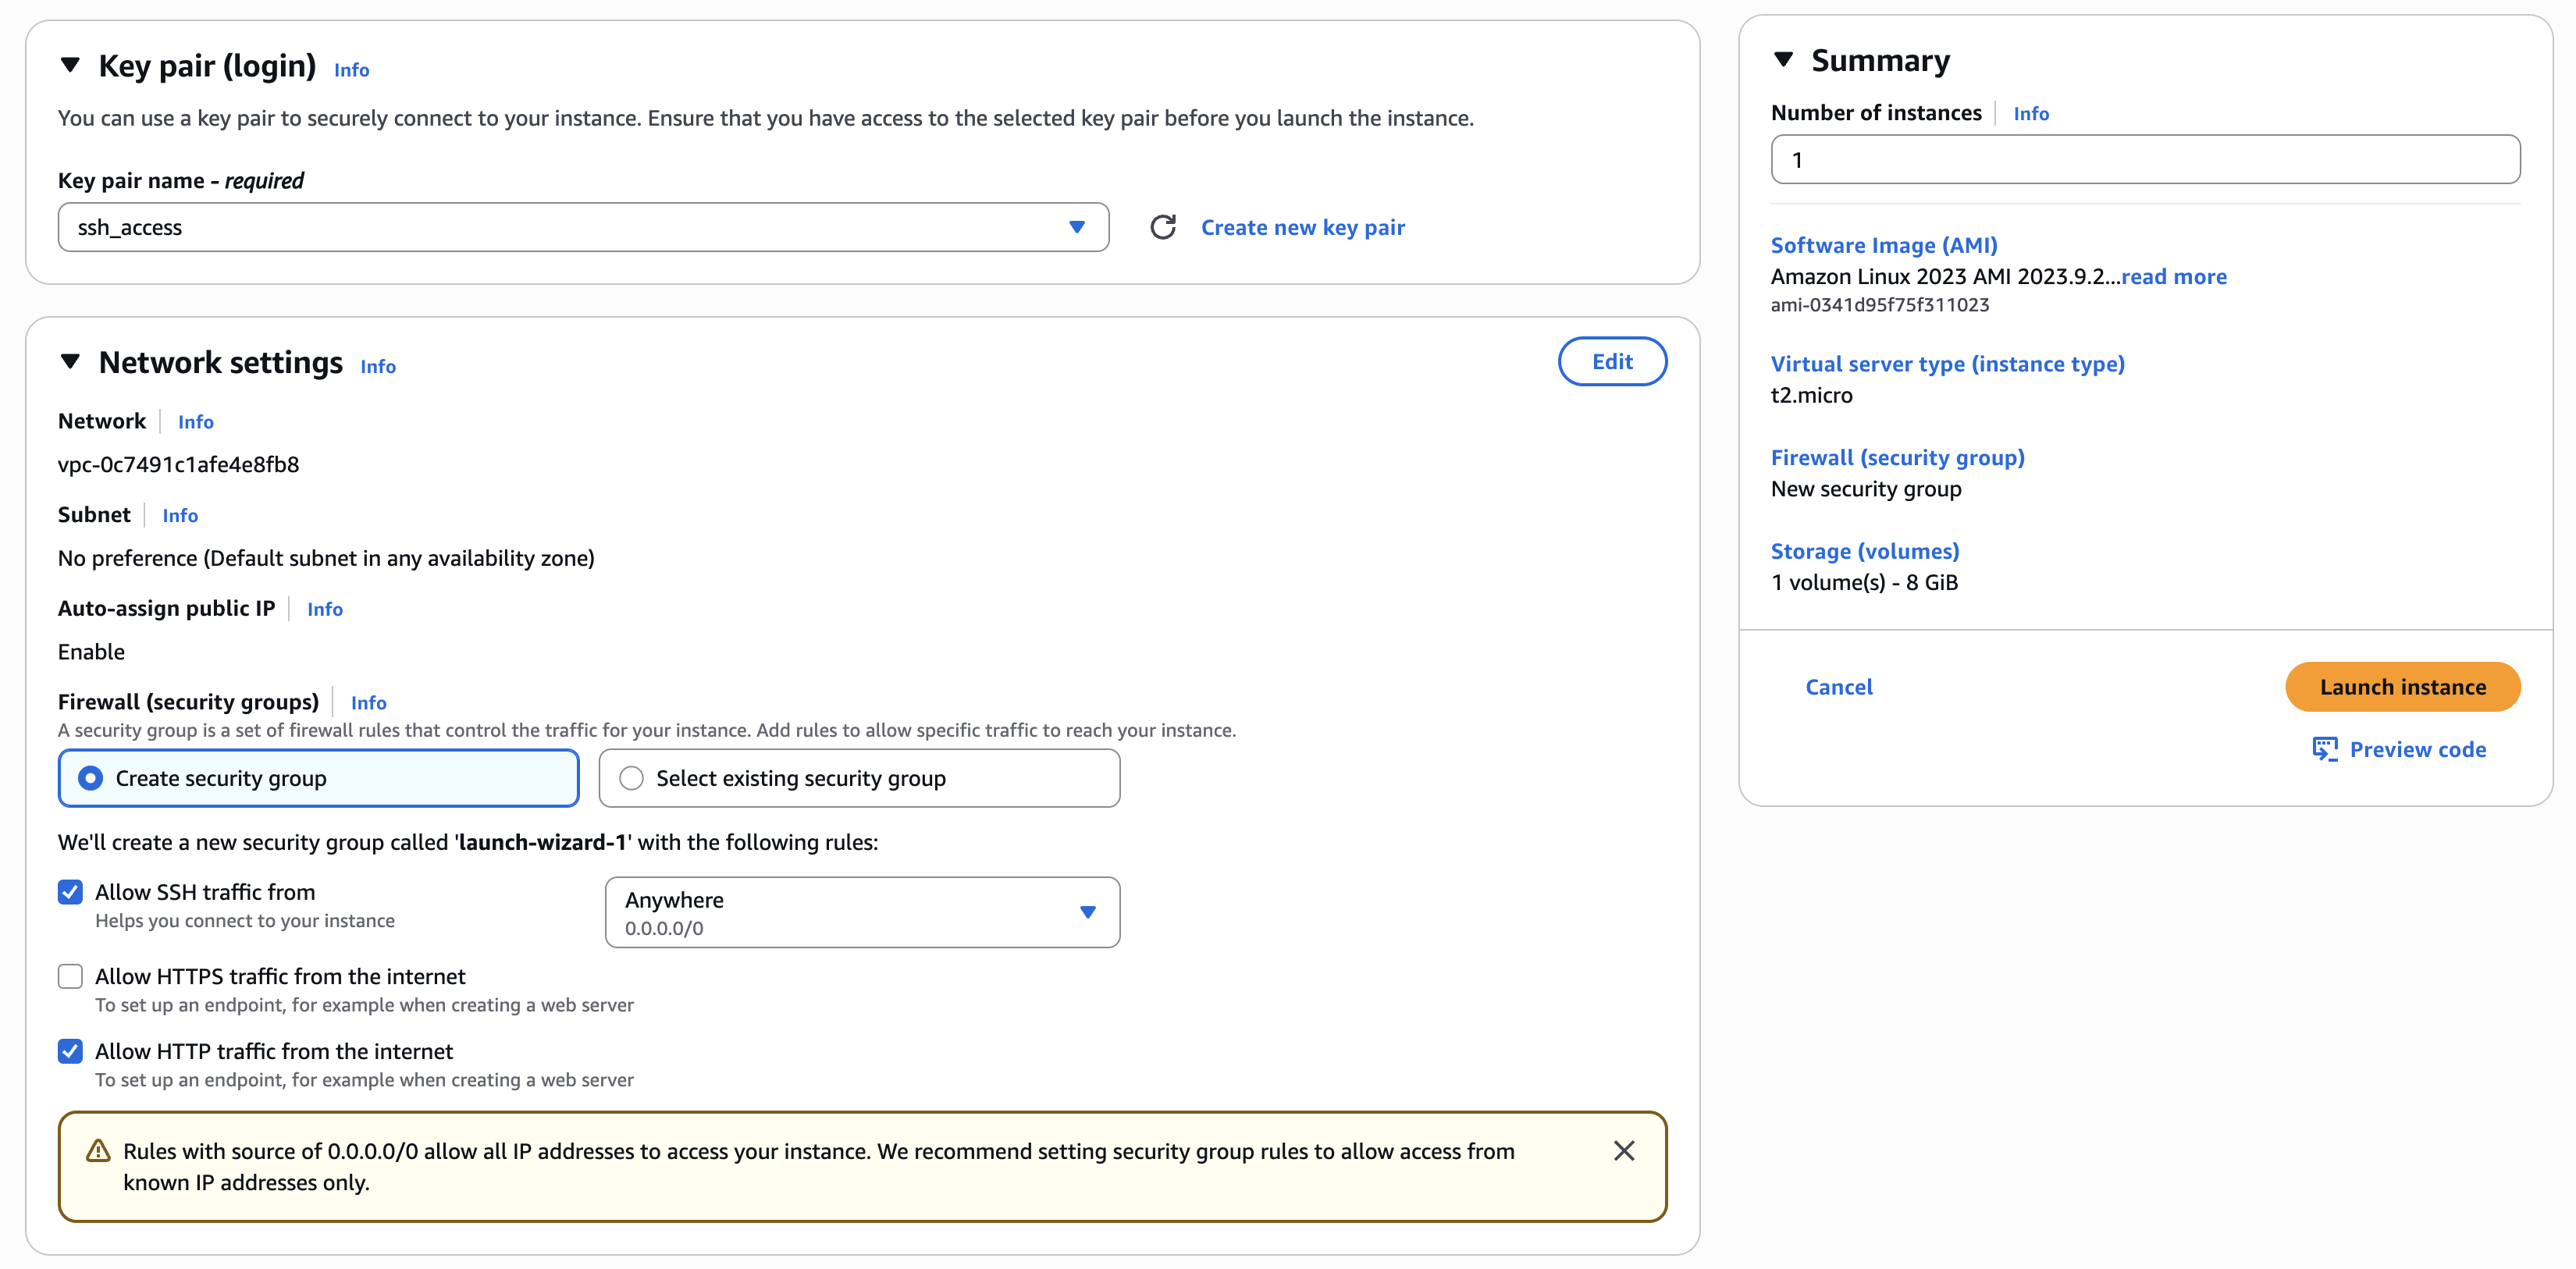
Click “Launch instance” and wait for it to spin up. Navigate to the “instances” tab by selecting the menu button on the top left, just under the AWS logo. You should see your instance listed!
AWS CLI
We could have also used the AWS CLI to do everything we just did. For now, we’ll just demonstrate how we can use the CLI to get information about our cloud account. Copy the instance ID of the EC2 instance you just launched as an environment variable.
export INSTANCE_ID=<paste your InstanceId here>
We can check its status:
aws ec2 describe-instances --instance-ids $INSTANCE_ID \
    --query 'Reservations[0].Instances[0].State.Name' \
    --output text
Get the public IP address:
aws ec2 describe-instances --instance-ids $INSTANCE_ID \
    --query 'Reservations[0].Instances[0].PublicIpAddress' \
    --output text
Connecting to Your Instance
Now let’s SSH into your cloud server! Find the public IP of your instance and use the private key you downloaded earlier:
ssh -i ssh_access.pem ec2-user@<public_ip>
If you see something like bad permissions, change the permissions on your PEM file:
chmod 400 ssh_access.pem
You should see a welcome message and a prompt like [ec2-user@ip-XXX-XXX-XXX-XXX ~]$. Congratulations - you’re inside a virtual machine running in an AWS data center!
Let’s verify what we’re running:
# Check OS version
cat /etc/os-release

# Check available memory
free -h

# Check CPU
lscpu | grep "Model name"
You’re now operating on a t2.micro instance with 1 vCPU and 1 GB of memory.
Deploying a Web Application
Let’s deploy a simple web application. We’ll use Python with FastAPI - a modern, fast web framework.
First, install Python and pip:
sudo dnf install -y python3 python3-pip
Create a directory for our application:
mkdir ~/webapp
cd ~/webapp
Install FastAPI and Uvicorn (the web server):
sudo pip3 install fastapi uvicorn
Now let’s create a simple web application. Create a file called app.py:
cat > app.py << 'EOF'
from fastapi import FastAPI
from fastapi.responses import HTMLResponse
import socket
import os

app = FastAPI()

@app.get("/", response_class=HTMLResponse)
async def home():
    hostname = socket.gethostname()
    instance_id = os.popen('ec2-metadata --instance-id').read().split(': ')[1].strip()
    availability_zone = os.popen('ec2-metadata --availability-zone').read().split(': ')[1].strip()

    html = f"""
    <!DOCTYPE html>
    <html>
    <head>
        <title>My AWS Web Server</title>
        <style>
            body {{
                font-family: Arial, sans-serif;
                max-width: 800px;
                margin: 50px auto;
                padding: 20px;
                background: linear-gradient(135deg, #667eea 0%, #764ba2 100%);
                color: white;
            }}
            .container {{
                background: rgba(255, 255, 255, 0.1);
                padding: 30px;
                border-radius: 10px;
                backdrop-filter: blur(10px);
            }}
            h1 {{
                margin-top: 0;
            }}
            .info {{
                background: rgba(0, 0, 0, 0.2);
                padding: 15px;
                border-radius: 5px;
                margin: 10px 0;
            }}
            code {{
                background: rgba(0, 0, 0, 0.3);
                padding: 2px 6px;
                border-radius: 3px;
            }}
        </style>
    </head>
    <body>
        <div class="container">
            <h1>🚀 Hello from AWS EC2!</h1>
            <p>This web application is running on a virtual server in the cloud.</p>

            <div class="info">
                <h3>Instance Information:</h3>
                <p><strong>Hostname:</strong> <code>{hostname}</code></p>
                <p><strong>Instance ID:</strong> <code>{instance_id}</code></p>
                <p><strong>Availability Zone:</strong> <code>{availability_zone}</code></p>
            </div>

            <p>This server is powered by FastAPI running on an AWS EC2 instance!</p>
        </div>
    </body>
    </html>
    """
    return html

@app.get("/api/health")
async def health():
    return {"status": "healthy", "service": "web-server"}
EOF
This creates a FastAPI application with:
- A home page displaying instance metadata
- A health check endpoint at
/api/health
Now let’s run it. We need to run it on port 80 (the standard HTTP port), which requires root:
sudo uvicorn app:app --host 0.0.0.0 --port 80
You should see output like:
INFO:     Started server process [12345]
INFO:     Waiting for application startup.
INFO:     Application startup complete.
INFO:     Uvicorn running on http://0.0.0.0:80
Leave this running! Open a web browser on your laptop and navigate to the IP of your instance. You should see your web application with instance information! Try the health check endpoint too: http://<your-public-ip>/api/health.
What just happened? You deployed a web application to a virtual server in AWS, configured the firewall to allow traffic, and made it accessible to the entire internet. Anyone with that IP address can access your site! Press Ctrl+C in your SSH session to stop the server.
Understanding What We Built
Let’s step back and understand the AWS components we used:
EC2 (Elastic Compute Cloud):
- Virtual servers in the cloud
- You manage the OS, software, and configuration
- Good for: web servers, databases, long-running applications
- You pay by the hour while it’s running
Security Groups:
- Virtual firewalls for EC2 instances
- Control inbound and outbound traffic
- We configured ours to allow SSH (port 22) and HTTP (port 80)
Key Pairs:
- SSH key pairs for secure access to EC2 instances
- AWS stores the public key, you keep the private key
- Without the private key, you can’t access your instance
In production, you’d also use services like load balancers (ELB), databases (RDS), and monitoring (CloudWatch), but understanding EC2 is where it all begins.
Making the Web Server Persistent
Right now, if you close your SSH session or the server reboots, the web server stops. Let’s make it persistent using systemd, Linux’s service manager. While we won’t be using systemd in the future, it’s a good tool to have some context about.
Create a systemd service file, which will describe the “unit” of work to run. Use vim to create the file: sudo vim /etc/systemd/system/webapp.service and put the following content in. If you haven’t used vim, press “i” to enter edit mode, paste the following, then close and save by pressing esc, :x, then enter.
[Unit]
Description=FastAPI Web Server
After=network.target

[Service]
Type=simple
User=root
WorkingDirectory=/home/ec2-user/webapp
ExecStart=uvicorn app:app --host 0.0.0.0 --port 80
Restart=always
RestartSec=5

# Logging
StandardOutput=journal
StandardError=journal
SyslogIdentifier=webapp

[Install]
WantedBy=multi-user.target
This service file tells systemd:
- After=network.target: Start after networking is available
- User=root: Run as root (needed for port 80)
- WorkingDirectory: Where to run the application
- ExecStart: The command to run
- Restart=always: Restart if it crashes
- RestartSec=5: Wait 5 seconds before restarting
- WantedBy=multi-user.target: Start on boot
Now enable and start the service:
# Reload systemd to recognize the new service
sudo systemctl daemon-reload

# Enable the service to start on boot
sudo systemctl enable webapp.service

# Start the service now
sudo systemctl start webapp.service
Check the status:
sudo systemctl status webapp.service
You should see output showing the service is active and running. Our webapp will now run after we exit our SSH session, and even after our instance restarts! Test it by rebooting your instance:
sudo reboot
Wait about 30 seconds for the instance to restart, then check if your web application is still accessible in your browser. It should be! The service automatically started on boot.
Cleanup
Important: AWS charges for running resources! When you’re done with the lab, clean everything up to avoid charges.
Stop the EC2 Instance
You can stop (pause) the instance to avoid compute charges while keeping the configuration:
aws ec2 stop-instances --instance-ids $INSTANCE_ID
Or terminate (delete) it completely:
aws ec2 terminate-instances --instance-ids $INSTANCE_ID
Recap
We created an EC2 instance and configured it’s firewall and SSH access. We used this instance to run a simple webapp and made it persistent with systemd. However, hopefully this lab demonstrates how unwieldy manually spinning up infrastructure can be. Imagine how painful this would have been if we had dozens of services, each with their own firewall configurations, SSH needs, and scaling considerations. We’ll use a tool called Terraform in the future to address this problem.